Tutorial // Centrepiece

So I was about to clean my studio yesterday morning and then a bucket of leftover blooms caught my eye... and so here we are! I excused it as practice with my blogging and photo skills, which is true - however my studio is still a big mess right now! Gotta get onto that asap.
With centrepieces (and as many arrangements as I can) I like to stay away from floral foam and use chicken wire where possible. I recognise there is a time and place for floral foam, when it's a must (especially here in the heat of Australia) but along with the fact that chicken wire is cheaper and reusable and foam is not good for the environment, nor your health if you breath it in, I also think chicken wire gives my arrangements a more free and natural look + if you want to take something out to rearrangement, you can - it can be a little trickier to do this with foam.
I hope you enjoy it!! Please feel free to leave a comment or question below.


MATERIALS:
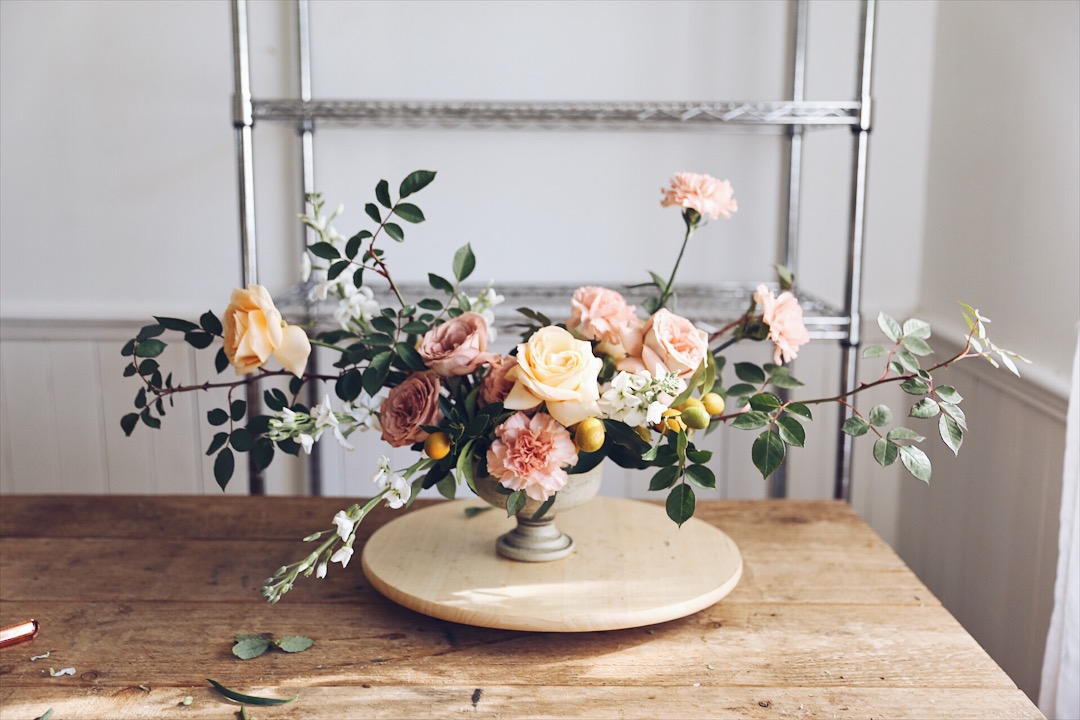
-Compote Bowl or a shallow bowl vessel with a wide opening. TIP: (sometimes I use pretty textured noodle bowls)
-Floral Snips! Important for obvious reasons.
-Chicken Wire - cut two lengths of chicken wire that are roughly twice the width of your vessel. Curl one over the other so that they make a loose ball in your vessel. Don't worry about this too much, but make sure they aren't cramped too much or you wont be able to get the stems in!
-Waterproof Floral Tape (or 'pot tape"), you want two pieces criss-crossed over the wire like in this image. Have the ends come down about a centimetre or two. When filling your vessel, be sure to not wet the end of the tape.
-Lazy Susan - optional. I find a Lazy Susan makes twisting your arrangements around and checking its shape a lot easier than walking around your bench a million times! TIP: If you don't have a high work bench like me, pop your Lazy Susan on a stable bucket to your preferred height - again much easier to work with!
-Flowers & Foliage! You can use whatever you like, although I encourage you to use a variety of shapes, sizes and textures. Adding in a few nice vines or delicate foliage and pretty fruits really makes all the difference! If you're a beginner, it might be easier to get the result you're after by using a monochromatic palette. I'll list the names of the flowers I used below.


STEP ONE
Start with your foliages! Use your foliage to create a base shape, add length and hide most of the chicken wire.

STEP TWO
Add your additional varieties of foliage or fruits. If you have heavier fruit, be sure to put them in at this stage to make sure the thicker stems have enough room in the wire holes. I think its nice to have fruits dangle over the sides of the bowl.

STEP THREE
This is where you'll add any long 'line' flowers. This type of flower adds length + when cut short, and placed low, adds small textures throughout.

STEP FOUR
Now add your rounded and large shapes flowers. Be sure to cut each stem at different lengths to create depth and 'layer' your blooms. Try not to force stems in where they don't want to go + work with gravity!


STEP FIVE
A lot of the time, I like to leave small textures last. I personally LOVE texture and finer detailed flowers when arranging. Use your textures to 'veil' over the larger blooms. Try not to let any flower heads in the arrangement touch and look squished in.

VOLIA!
I'd love to see what you create! Use the #OhFloraTutorial on Instagram.